Adding Option Files to the Shopping Cart
 Option File Name Give this file a name in our example we will use tshirt for the file name. In order for the customer to see our options we must put the option file name in the appropriate place in the shop item. So instead of 'blank' on the shop item in the option file box we will now want to put 'tshirt'. You can do this when you enter the item in the first place or you can go back and edit the item to add it. Note: When you put the option file name in the shopping cart item, if you have put in a file name for an option file that doesn't exist or is incorrect a big bold error will be displayed when the customer goes to your shop so it is a good idea to check these as you enter them to make sure you haven't make any mistakes.
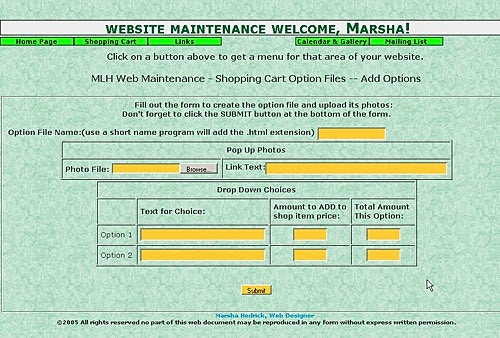
Pop-Up Photos
Link Text Enter the text you want for the link to pop up the photo. This link will appear in the long description for the item. In our example we will use 'See Rinestone Shirt' for the caption.
Drop Down Choices
Amount to add to Shop item Price This is for how much you want to add to the base price of the item if the customer chooses this choice. In our example we would enter 0.00 on the first line for the 'Printed Shirt' choice and we would enter 5.00 on the second line for the 'Rinestone Shirt' choice. If all the choices are the same price do not enter anything in this box.
What you enter into this box will depend on what you enter for a price in the price box on the shop item when you enter it under 'ADD ITEMS'. There are a couple of ways you can do this.
1. You can enter 0 for the price in the shop item. In this case you should enter the price of each option in this box on the option file.
2. You can enter the price of the lowest priced option in the price on the shop item. In this case you would add the increase in price for each of the higher priced options in this box. This is our example
3. You can enter the price of the highest priced option in the shop item. In this case you would enter a negative value in this box equal to the discount for that option. For example if you put the price of the Rinestone shirt in the shop item ($15) you would want to put -5 in this box for the printed shirt and 0 in this box for the Rinestone shirt.
Total price for Choice In our example lets say that the printed shirt is $10 and the rinestone shirt is $15. We would then enter 10.00 on the first line for the 'Printed Shirt' choice and 15.00 on the second line for the 'Rinestone Shirt' choice. This is always the actual price the person is going to pay for the option.
When you have completed entering all the choices you click on the 'Add Option File' button.
TOP OF PAGE
Deleting Option Files
TOP OF PAGE