Adding Art to the Shopping Cart
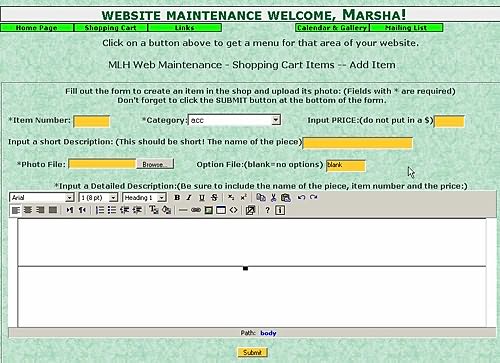 The page where you will enter the information about your art is shown to the right.
Input Item number This is a number unique to each item. The programs will not let you add a duplicate item number. Enter a short number for the piece.
Input Category This is the category in which the item will appear. The categories that are available for your website will appear in the drop down menu. Choose the category you wish to place the item in. Note. A 'New Items' category is available and is a good place to put things when you first put them on your website. After a few weeks you can edit the item and place it in its final category. This way frequent visitors can see your most recent art quickly.
Input Price Enter the sale price for the item.
Input a Short Description Enter a short description for the piece. This can be the name of the item or something short that identifies the piece. This along with the item number is what you will receive in the email when someone orders the item. It is also what the customer will see if they have added an item to their cart and when they click the 'View Cart' button.
Photo File name Click the Browse button and browse to the photo file. (You can type in the name if you like but you must include the complete path to the photo or it won't work. I recommend that you use the Browse button to avoid errors)
Input a Detailed Description This and the photo are what the shopper will see when they look at your shopping cart.
This should contain the item number (or name of the piece if it has a unique name) and the price so the customer can see the price and the item number. That way if the customer has any questions about one of your items they can email you and inquire using the item number and you will know what they are talking about.
This area can be used to tell the customer all the features of the piece or the spiritual meaning or message you are trying to convey with the piece. This is where you sell the piece.
Input Option File Name This box will default to 'blank'. For most items you should leave this as it defaults. However, in some cases you may want to add an option file. This is case sensitive! Note: When you enter the option file name, if you put in a file name for an option file that doesn't exist or is incorrect a big bold error will be displayed when the customer goes to your shop so it is a good idea to check these as you enter them to make sure you haven't make any mistakes. (See the option file help file to find out when you would want to use this feature and how to build the option files)
When you have finished filling in this form you simply click on the button 'Add item to shop'.
At this point a customer will find the item in the shop.
TOP OF PAGE
Editing/Deleting Shop Items
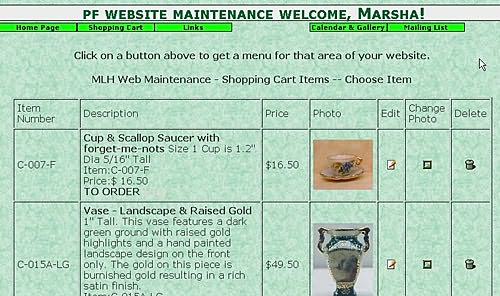 When you choose the 'Edit/Delete Shop Items' option you will first choose the category that you want to edit items in.
Then you will see a page that contains all of the items in your shop in that category. It will look like this the photo to the right
You will notice three icons to the right of the page. From left to right these icons are 'Edit', 'Change Photo', 'Delete'
To edit an item click the 'Edit' icon. The information for that item will be loaded into a screen that looks like the one below.
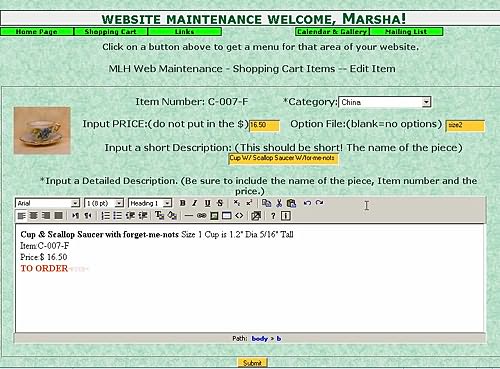 You can then change all of the information for this item except its item number. (The photo can be changed if you click the 'Change Photo' icon instead of the 'Edit' icon)
Just click in the box containing the information you want to change and make your changes.
When you have completed your changes just click on the 'Submit' button at the bottom of the page and the item will be updated.
If you click the 'Change Photo' icon you will get a page with the current photo displayed on the left and on the right a photo field with a browse button just like the one on the ADD page. There will be a Submit button under the Browse button. Just click the browse button and find the new photo. NOTE:Make sure that it is not named the same thing as the old photo or you are likely to end up with no photo in the item. Click the submit button and the new photo will be uploaded, then the data file will be changed to reflect the new photo, then the old photo will be deleted.TOP OF PAGE
Deleting Art from the Shop
TOP OF PAGE